onsdag 27. februar 2008
Einars workshop plan
#1 Its a privilege
#2 Be professional
#3 Be prepared
#4 Make a good workshop setting
#5 Be inviting
#6 Have an inspiring inventory
#7 Be realistic. choose your scope carefully
Choose a workshop level thats realistic
#8 Be strict. Make rules, its your workshop
#9 The workshop as a story. (Dynamics!)How should it start and end
#10Where do you start? Explore the context, make a drawing.
#11 Make clever tasks! Simple and immediate
#12 Successions of tasks and questions. Have a backup plan
#13 Distribute and produce
#14 Gather knowledge, angles and inspiration
#15 Design task and materials
#16 Provide an inspiring starting point, ("ideacards")
#17 The context shapes the output
#18 Design the context
#19 Consider what output you want (Drawings,lists+)
#20 Talking and doing. Have something to talk around. Put stuff on the table
#21 Summary is optional
#22 Preapare
Do not underestimate the power of coffee and sugar!
mandag 25. februar 2008
tangible interaction; consept developing

This is a "rfid sound pillow". You pick the storybook you want to listen to, place it over the pillow so the pillow know which story to tell, rest your head on the pillow, and listen to the story. You can follow the story in your book and look at pictures.

Rfid paint. This is a paintbrush whit a rfid reader, and boxes whit different paints and pattern to use.
http://www.youtube.com/watch?v=p-IlwqXi1MU
Martin showed me this project which is very similar to what i thought.. just that my thought was much more simple
mandag 18. februar 2008
"the scream cup"
Knut and I wanted to make something out of the arduino workshop,
so we decided to make a robot/alien thing out of a cup, led lights,
sensor,and a speaker.

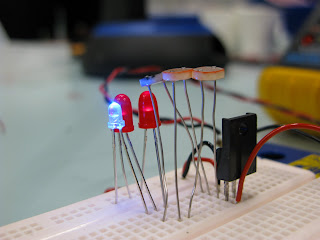
The technology of the "scream cup" placed on the breadboard.

Then we placed all the components inside a cup, and connected the arudino board to a 9v battery, so there was no lines going out from the cup.

Tata! The finished scream cup.
so we decided to make a robot/alien thing out of a cup, led lights,
sensor,and a speaker.

The technology of the "scream cup" placed on the breadboard.

Then we placed all the components inside a cup, and connected the arudino board to a 9v battery, so there was no lines going out from the cup.

Tata! The finished scream cup.
Abonner på:
Innlegg (Atom)


